
Adding a WordPress favicon to your website is so simple just Imagine browsing through numerous tabs in your web browser, searching for a specific website. Suddenly, your eyes are drawn to a distinct, eye-catching icon that represents the brand you’re looking for. That is the power of a favicon.
Favicons not only enhance the visual appeal of your website but also act as a unique identifier that differentiates your site from others. By incorporating a favicon that aligns with your brand’s logo or visual identity, you create a consistent and memorable browsing experience for your visitors.
So, In this blog post, we will walk you through the steps to upload and set up a favicon in both the FSE theme and classic theme. Additionally, we will address best practices for favicon design, including recommended dimensions and file formats.
By the end of this tutorial, you will have a clear understanding of adding a WordPress favicon to your website, and you’ll be equipped with the knowledge and tools to add a professional favicon to your WordPress website
Steps to add a favicon in WordPress Gutenberg (FSE)
At First, we will see the steps to add a favicon within the WordPress Gutenberg block (FSE).
Step 1: Prepare your favicon
Before you begin, you’ll need to create a favicon image. The recommended size for a favicon is 512×512 pixels. Ensure that your image is in a common format like PNG, JPEG, or GIF.
There are numerous graphic design tools available, both free and paid, that can help you create a favicon. Alternatively, you can hire a designer to create a custom favicon that aligns with your branding.
Step 2: Log in to your WordPress dashboard
To add a favicon to your WordPress website, log in to your WordPress dashboard using your administrator credentials.

Step 3: Navigate to the Appearance menu
In the WordPress dashboard, locate the “Appearance” menu on the left-hand side. Hover over it, and a submenu will appear. Click on the “Editor” option.

Step 4: Access the Site Identity settings

In this demo we are using “Gutenify Business” which is an FSE theme but all the steps are the same for each FSE theme out there. After adding the website logo you can enable option to use this as a favicon.

As the chosen logo would be same for both logo and favicon.
📝 Note: Check more details on adding the WordPress logo. Here
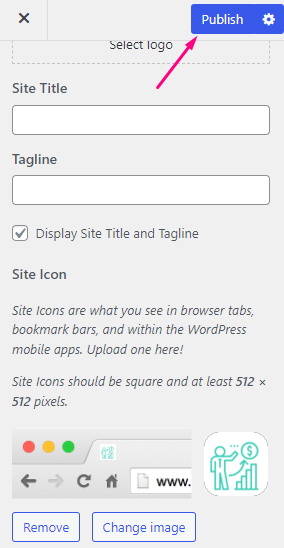
Step 5: Publish the Changes
Once you’ve set your favicon, click on the “Publish” button in the top-left corner of the Customizer to apply the changes to your website.
Step 6: Check the favicon on your website
After publishing the changes, open your website in a web browser and check if the favicon appears correctly in the browser tab. It may take a few minutes for the changes to propagate, so if you don’t see the favicon immediately, wait a little longer and refresh the page.

Congratulations! You’ve successfully added a favicon to your WordPress website. The favicon will now be displayed whenever someone visits your website, helping to reinforce your brand and make your website more memorable.
Steps to add a favicon using the WordPress Customizer
Changing the favicon in a WordPress Classic theme can help you personalize your website and improve its visual identity.
Follow these simple steps to change the WordPress favicon in the Classic theme.
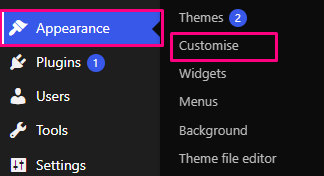
In the WordPress dashboard, go to “Appearance” and click on “Customize.”
This will launch the Theme Customizer, which allows you to modify various aspects of your theme.
Look for the “Site Identity” tab or section within the Theme Customizer.
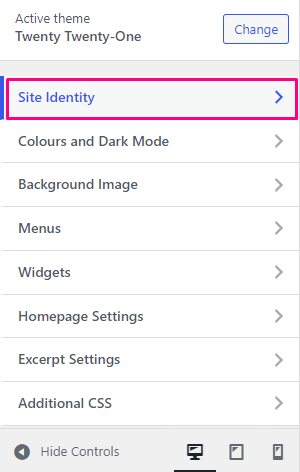
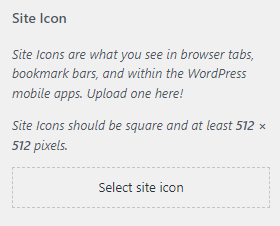
After clicking on the Site Identity section, you should find an option to upload or select your favicon. It may be labeled as “Select Site Icon” or “Favicon.” Click on the button to upload or select your favicon image from your computer’s files.
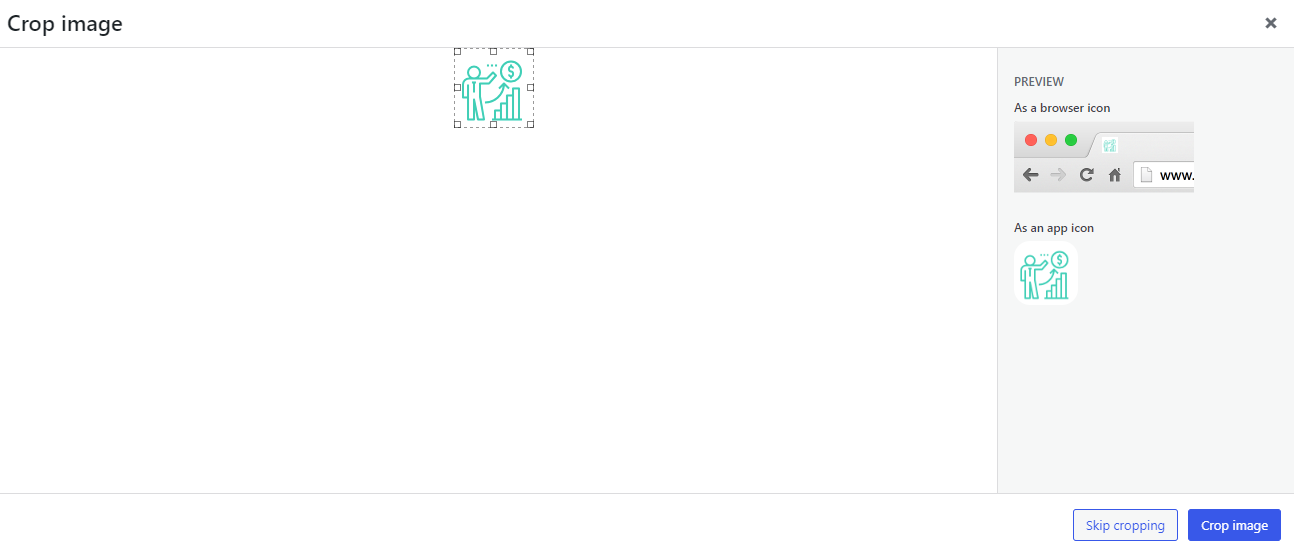
It is advisable to ensure that your favicon meets the recommended dimensions of 16×16 pixels or 32×32 pixels, as this will ensure optimal display. However, if your image does not meet these specifications, WordPress provides a convenient cropping tool that allows you to adjust the favicon directly within the platform.
After uploading the favicon, click on the “Save” or “Publish” button within the Theme Customizer to save your changes.
Visit your website to see the updated favicon. It may take a few moments for the changes to take effect due to caching.

Remember, Adding a WordPress favicon to your website is a small but important step in creating a professional and cohesive online presence. Take the time to design a favicon that reflects your brand identity and stands out visually. With these simple steps, you can enhance the user experience and make your WordPress website even more appealing.
Conclusion
We have seen two simple methods of adding a WordPress favicon to your website: through the Gutenberg block editor (FSE) and the WordPress Customizer.So go ahead and give your website a distinct visual identity by adding a WordPress favicon to your website using either the Gutenberg block editor (FSE) or the WordPress Customizer.
Leave a Reply